6.23.2010

Living Room Redo

I opened this blog with a meditation on finding a loveseat that would be appropriate for the modest proportions of our living room. I tested an alternate furniture arrangement for a few months and kept hoping the time would be right to consider selling the existing sofa. But this moment never arrived; and besides, it turns out that the arrangement didn't work anyway.


There was a great seating arrangement around the fireplace, but the space behind the sofa was dead. The rug was only on temporary loan from our son, who had bought it for his dorm room. And we kind of had to let him have it back. (He has great taste in rugs, though, doesn't he?)

So, I moved the desk back into the dining room, placed the sofa between the windows again and thought about it some more. I concluded that the best recourse was to slipcover the sofa and make a couple of other small changes.

But how to do this on the smallest possible budget? Even 20 yards of inexpensive fabric can add up. And what color/type of fabric? 

Here is the list of changes I made to "finish" the living room:

1. Slipcover sofa
2. Purchase a decorative element to go on the wall over the sofa
3. Purchase a floor lamp to complement existing floor lamp on one side of the sofa, for reading
4. Paint the room a "better" shade of white

And here are the changes I made.

1. Use Ikea curtains for the slipcover fabric!

I decided to use blue and green as the main color theme for the first floor of our house. The living room wanted more blue in it, so blue it was. My choice was Ikea's Lenda curtains in light blue. It is a tough, fairly tightly woven chambray.


It has a subtle stripe woven in every six inches, which made cutting out the fabric and lining up seams a bit easier. I think I ended up purchasing 5 pairs of curtains at $25 per pair. And I have a bit less than two curtains' worth left, should I need to sew a replacement cushion cover or two. I started this in February, and stumbled along until I finished in May.

Next, I splurged on a decorative trim for the bottom hem. It is the popular Greek Key design, in pale blue and antique, from M&J Trimming.


Good so far. Finally, as the "pillow queen," as my husband calls me, I had to recover the current pair of throw pillows. I wanted something more current and saturated in color to punch up the dusky blue of the sofa. Calico Corner's Tala in Bluemarine from their Annie Selke collection fit the bill perfectly.


2. Use a round mirror

We've been in this house for seven years, and I still couldn't decide what I wanted to hang on the space above the sofa. It is typical to hang a piece of art designed to blend in with the color scheme; it is also dreadfully boring and predictable. Among other ideas, I considered framing a piece of wallpaper, hanging an old textile, doing a gallery-style collection of assorted smaller pieces, painting a mural, or just doing nothing. In the meantime, we tried two or three pieces we already owned. They all made me yawn. Then it struck me that we needed something round. There are already so many squares and rectangles in the room. A round object, specifically a mirror, would liven up the somewhat plain jane furnishings. This one from Ballard Designs not only meets my requirements, it was affordable:


3. Find an affordable floor lamp that complements the other four in the room, none of which match.

This was easy. I found it on the Circa Lighting website, on sale. Nuff said.


4. Find the right white

Sigh. This was the most difficult part. I ended up taking home large samples from my firm's Benjamin Moore professional catalogue of BM colors. I considered Acadia White, Navajo White, Lancaster Whitewash, and White Dove. I chose Lancaster Whitewash, which wasn't too pink or yellow, but more of a very pale warm cement. Warm cement doesn't sound very nice. But really, it makes a great wall color.

Next post:  the results!

6.01.2010

Part Three, the Story of My Garden

I wrote earlier of the giant arborvitae hedge that we removed in the summer of 2007. Today I have a lovely sunny border in its place. We planted some hollies to continue the border that was adjacent to the arborvitae. In front of the hollies, and closer to the back steps I have a small border that blooms primarily in the summer and fall. There isn't much happening in the spring in this border, but I have saved that for another spot in the back yard.


Calamintha nepeta nepeta in the early morning sunbeam. Next to it is a toppled over verbascum 'Southern Charms'. It's very lovely, but it falls over with the slightest provocation.


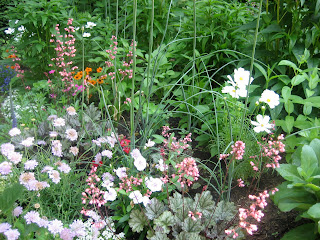
Against a backdrop of monarda 'Raspberry Wine' are a couple of allium atropurpureum, veronica 'Blue Fox', salvia 'Eveline' to the right. The astilbe 'Amethyst' is taking shape just to the left of the allium.


The sensation cosmos in white sparkles next to the heuchera (I believe it's 'Pretty Polly', but I need to check that). To the right is a catmint.


Here's my favorite vignette of this border so far this year. The gray-tinged purple and green crinkled foliage of the heuchera is set off by the light pink dianthus (slightly overexposed in this image), the strong red dianthus, and the white cosmos. To the right is the sedum 'Matrona', which has a blue undertone that complements the gray cast of the heuchera. In the background you can see the orange zinnia. As the garden matures, the zinnia boosts the gauzy pastels.


The veronica 'Blue Fox' pokes out from the foliage of the heuchera. The scabiosa 'Pink Mist' mingles with the pink dianthus.


Another view of this vignette. A renegade verbascum rises from the scabiosa. It will probably flop over in a day or two, but right now it looks great.


With the neighbors' house in the background, you can see the sunny border from the west to east. Note my 24th anniversary gift from my husband - a new set of garden furniture, which arrived just in time for the Memorial Day weekend.


On the west side of the sunny border, the calamintha mixes with astilbe 'Bridal Veil'. You can just make out the malva on the upper right corner. It started as one plant five years ago, and has re-seeded itself every year since then.


Another view of the east side of the border, with coreoposis 'Moonshine' getting ready to bloom. Next to it is an echinacea 'Rubinstern' and more of the veronica 'Blue Fox'. Baptisia seeds pods are lying next to the echinacea.


A box ball sits next to the lady's mantle. To the right is the aptly named anenome robustissima. I had to place some corrugated metal stripping next to the anenome so it wouldn't overtake an adjacent hibiscus syriacus. Behind the alchemilla is a two year old Calamagrostis 'Overdam'. Next to the grass is a new favorite - echinacea 'Pink Double Delight'.


A view along the sunny border leading to our side yard.


The zinnia really pops out here.


I'm very happy with the contrasts in foliage color and form here.


Many of these flowers float above the foliage. A little cabbage moth has been darting around them for the past few days, brushing by the dainty flowers and making them dance around.


I can't blame the deer here - some birds have been snacking on my sedum 'Matrona'. 


The salvia 'Eveline' has just been planted this spring, so it is still pretty sparse. But some dianthus and sweet alyssum are filling in next to it this year. Next year the salvia will probably take over this spot.
Veronica on the left.


The sun starts to to pour over the border.


Another view of the sunbeam. It highlights the astilbe 'Amethyst' beautifully. The violet astilbe will really pop next to the zinnia once it blooms.


Looking along the border, the structure of the plants is carrying the planting along until the summer color arrives in its full glory.


One last view of the sunny border in the early morning. Regrettably this lovely view terminates in an HVAC condenser unit. The practical realities always seem to get in the way of the ideal, don't they?

Part Two, the Story of My Garden

Just as the composition of the garden was beginning to gel, another fly in the ointment:  we became host to a herd of deer. Suddenly, the lilies, sedum and several other tasty morsels became a veritable salad bar for our local herd. As I stood outside one morning at the top of the back steps and yelled at them, they barely looked up and just kept right on munching.

So out went the Casa Blanca lilies and several other favorites. I did learn that many of my existing perennials, however - the echinaceas, yarrows, astilbes and japanese anenomes - were deer resistant. I soon compiled a list of additional plants that the deer would not, it would be hoped, find too tasty. But I did hang on to my hostas and sedums. No one, not even Bambi, would make me get rid of those.

Here few snap shots of my garden yesterday morning, Memorial Day 2010.


Here's the hosta guacamole, alongside the japanese painted ferns and a bit of ajuga. They are in front of one of the forlorn boxwoods damaged in the winter 2009/2010 blizzards.


Next is the goatsbeard, flopping lazily over the astilbe. This is the astilbe 'Peach Blossom.' It is not as quite as graceful as the others in my garden, but it tolerates dry shade better than the others.


The goatsbeard, astilbe and hosta 'Guacamole', which maintains its fresh green appearance all summer. It will eventually sport incredibly fragrant large white flower spikes.


A view down the shady border. Note the boxwoods tilting permanently to the right!

Hello Again, and Part One of the Story of My Garden

Time, as they say, has a way of slipping away. Today I am re-starting this blog in time for summer adventure and relaxation. What better way to get started than to introduce my garden.

My chapter in this garden has been seven years in the making, although it was started in 1950 by the previous owner. When we moved here in 2003, as only the third owners of a 1940 property, we had the great bones of a well established, but rather overgrown, garden of boxwoods, hollies, and a dozen Tropicana roses.

Did we ever have boxwoods. Probably 200-250 of them all told. Many of them squeezed in places where they could no longer be accessed, or where they had grown over and prevented passage. In other places they were growing in full force of the Washington summer sun, and fading quickly. So we started to purge. And believe me, it's not easy to get rid of boxwoods. The idea was to carefully edit by keeping only selected single boxwoods and nearly all of the curving hedges. We were able to give away several of them. We also managed to relocate many of them. And in one heartbreaking instance, a small hedge of them, which I had relocated only four months earlier, were decimated in a split second one January day by a falling avalanche of snow from the sunroom roof. It was horticide of the first order.

We suffered further disappointment this past winter, following the now-famous Snowpocalypse and Snowmaggedeon blizzards.


It certainly did look beautiful under the blue winter sky.


Here's the proud snow shoveler standing in front of his piece de resistence. This completely blocked off access to our back yard for about a month. On the right you can see one of the American boxwoods bent over into the driveway.

All of the boxwoods in the back yard, both English and American, bent over  under the weight of the heavy wet snow for about three weeks. Usually our heavy snows melt away in a matter of a few days. These back to back storms kept the shrubs doubled over for nearly a month. Although we didn't lose any of them outright, they did suffer tremendous disfigurement. The hedges in the front yard fared much better, for some reason.

There were also several yews that tightly girdled the front and back entrances. As much as I like yews, these again were completely misplaced. But digging these out, as anyone who has dared can tell you, is difficult because of the deep and stubborn tap roots. After digging deeper and deeper without disturbing the tap root, he finally climbed down into the hole attacked it with the masonry saw. That did it!

The poor old Tropicanas died away, one by one. I tried for three years to keep them going. But the back yard had become so shady since they had been planted years earlier, that they barely bloomed. I also tired very quickly of the spraying and coaxing that still resulted in black spot and stunted blooms. So out they went.


A beautiful flower that fades from salmon to soft pink. But I was no match for the black spot and mildew.

The most dramatic change involved removal of a 30 foot long, 30 foot high arborvitae hedge close to the house. Not only did the Green Monster bathe the east side of our back yard in shade, it was rapidly growing out of control. Time for that baby to go:  I spent an entire paycheck on having it removed, just as it was threatening to walk in the back door. Suddenly I had a whole new section of garden to merge into the existing plantings.

It was time to rethink the entire plan. With my interest in perennial gardening in a more natural style, I started to divide the garden into different zones. I obsessively observed the sun traveling over the yard from morning to night during all the seasons of the year. I noted the consistently sunny, partly sunny, and pretty much always shady spots. I also noted the dry spots (e.g., under the neighbors' 70-foot holly tree) and the wet spots. Over successive summers I tried (and often failed) with a variety of perennials, biennials and a few annuals to fill in. I tried different color combinations, heights, foliage colors and textures. And often I found plants that either got too comfortable with their accommodations, or those that could barely grow before they fell over. I dug new beds, made them bigger, and then made them bigger again. I added bags and bags of compost. My effort has finally started to pay off.

I feel that I am now very close to settling on a plan and a selection of hardy plants that more or less can survive our sultry, humid summers, wild springs and unpredictable winters.

Next, Part Two of the story of my garden.